
In this tutorial we will deploy a Python Django app to AWS Elastic Beanstalk. Also we will plug it to our own domain, with full SSL support. Finally we will add HTTP to HTTPS redirection, so that no unsecure connection to our app can happen.
1) AWS Certificate manager (ACM)
Starting from a domain you own (from GoDaddy for instance), create or upload a SSL certificate on ACM, through the AWS console. To create a SSL certificate for a domain from an external provider like GoDaddy, please follow this short tutorial.
2) Prepare your Django project for deployment
Go to the root of your Django project and create a folder called .ebextensions . In this folder we're going to create 2 files 01-django.config and 02-lb.config :
Replace mysite/wsgi.py with your own WSGI path. This is used to plug the Apache HTTP server to Django on the AWS EC2 instance.
Replace <CertificateARN> with the ARN of your SSL certificate from step 1) . Finally commit these files to your local git repo. ( git add . then git commit -m "eb extensions")
3) Install EB cli
Run:
pip3 install awsebcli --upgrade --user
4) Create and deploy your Elastic Beanstalk app
Initialize your local Elastic Beanstalk client by running :
eb init
Then create the Elastic Beanstalk environment on AWS :
eb create django-env --elb-type application
You can replace django-env with your own environment name. The - -elb-type part is to tell AWS we want a Load Balancer of type application instead of a classic one. It is used for HTTP to HTTPS redirection.
Now deploy your Django app :
eb deploy
5) Find your Elastic Beanstalk domain name
Run:
eb status
It will output something like this:
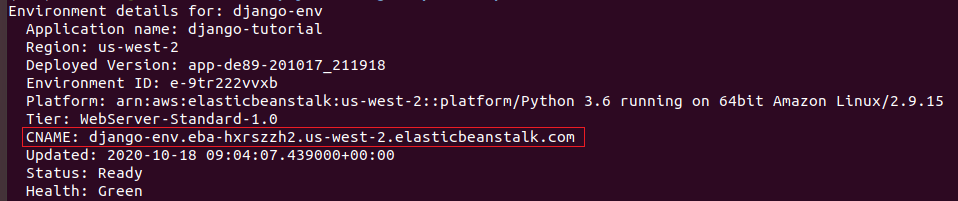
Look at the line that starts with CNAME: , this is your Elastic Beanstalk domain name. It should look like this: django-env.eba-hxrszzh2.us-west-2.elasticbeanstalk.com
6) Plug your domain on top of Elastic Beanstalk
The final domain where I want to access my Django app is demo.robodata.fr . This is the domain for which I created a SSL certificate in ACM in step 1) . So now I go to my domain provider where I own the domain robodata.fr , and I add the following CNAME entry (using the Elastic Beanstalk domain from step 5)):
CNAME demo django-env.eba-hxrszzh2.us-west-2.elasticbeanstalk.com
7) Test your Django app
Your app is now accessible at both http://demo.robodata.fr and https://demo.robodata.fr . Both use SSL and no unsecure traffic is allowed. You will see the SSL lock in your browser:

That's it ! You now have a secured Python Django app that you can share with the world. If you need help leave us a reply, we answer within 24 hours.
